Saturday, January 23, 2016

Bake and Freeze

My life is usually pretty busy between work, family and friends. When I got married I started the habit of cooking every weekend for the week ahead. It made it so much easier to stay on a budget, eat good food for lunches and dinners and stay healthy. My husband always enjoyed a home cooked meal but by the time we would both get home from work he would be starving, picking from the fridge, and I would be too exhausted to cook.


Now, I think cooking is very relaxing and helps me to decompress but when I'm tired from a 10-12 hour day of treating patients, I have little to no patience for it... especially the clean up. Who am I kidding? My husband usually did the clean up as I despise cleaning (but am getting better! Right, honey?... honey?) but he didn't like having to clean so late at night either. Cooking on Sunday allowed me an afternoon to decompress and while assuring that we had little to no cleaning during the week. I was able to feed a hungry husband quickly with good food and sit down and relax with him rather than being in the kitchen.


After I went gluten free, my husband started to really miss bread and other baked goods. He's Turkish and most meals revolve around the bread. I was fine with skipping out on the bread but it made the meals less enjoyable for him. We tried every GF bread product out there but it always fell a little short... They were dry, crumbly, lacked flavor and EXPENSIVE!!! I love cooking because it not only fills the belly but it fills the soul. It was hard to see my hubby sad because something so near and dear to him was no longer available.


I love, love, love the blog Gluten Free on a Shoestring because she makes amazing baked goods from your childhood memories and it's all GF! I used to try out her bread recipes from her third cookbook and my hubs would DEVOUR them. Finally GF bread that tasted like... BREAD! Didn't think that was possible.


The hubby was so happy and deprived of his beloved bread that he would eat it all up so quickly, leaving me frustrated because it takes some planning and baking doesn't come naturally to me. I love cooking because it's a "little of this" "little of that" while baking is super strict and must be exact. Since moving to SoCal and taking some time off to open my practice, I've had some time on my hands and have found my answer to this frustration, baking and freezing! I spent 2 days one week making multiple batches of biscuits, breads, pancakes, etc. I thought these would be gone in two seconds flat but I'm finding that since we have so much of it in the freezer, waiting for us, we don't consume it quickly. We know it's there and can take some if we want but don't have to worry that it's a hot commodity going quickly!


I encourage you to try this and take a weekend to bake and freeze. It's so nice to dress up a dinner or even a breakfast with a pre-made, delicious, baked GF treat. This morning I heated up some biscuits, topped with basil pesto, fried eggs and some dashes of tapatio sauce for a tasty weekend brunch without all the work :-)


Here are the links to my favorite freeze and bake items:
Biscuits
Zucchini Yeast Bread (use as a sandwich bread, the zucchini makes it moist)
Pancakes
Pumpkin Bread
English Muffin Bread


Wednesday, January 13, 2016

Gluten Free Butternut Squash Pizza

What's better than pizza? Almost nothing! I'm often trying to find new, interesting things to do with pizza dough. This is a pizza with more a sophisticated taste. The sauce is made with pureed butternut squash and is topped with fontina cheese and sage leaves.


It is a great pizza for fall and winter. This is a pizza I tend to do for dinner parties as an appetizer. I slice it into long pieces that people can snack on. Last time I made this pizza, it was for our going away party from Connecticut. One of the ways I show my love for people is by cooking for them. Nothing says I care for you, than filling their stomachs with tasty food made with love. Everyone thought I was crazy for cooking appetizers and desserts for my own going away party. "Get it catered!" everyone said but I just couldn't do it even though our movers were coming 2 days later to pack us up and move us out! All of the 35+ people we invited were very close to us and I wanted to show my appreciation for their friendships throughout the years. People feel the sincerity when you cook for them! I hope you make this for some special people in your lives. Enjoy!


Gluten Free Butternut Squash Pizza
Cooking Time: 45 min
Serving: 1 large pizza

1 gluten free pizza dough recipe (I use this recipe but you can use Bob Red Mill's pizza dough mix)
2 10-oz packages frozen butternut squash puree
1 tablespoon cumin
1/4 teaspoon ground nutmeg
1 1/2 teaspoon salt
1 teaspoon pepper
6-8 oz fontina cheese grated
2 tablespoons finely chopped fresh sage leaves plus full leaves for garnish on top

1. Preheat the oven to 400 degrees with a pizza stone in the oven or a large baking tray. Line another baking sheet with parchment paper and set aside.

2. Prepare the dough as directed and let it rise while you make the butternut squash sauce.

3. Defrost the butternut squash puree in either the fridge overnight or in the microwave. Mix in the cumin, nutmeg, salt and pepper.

4. Grate the fontina cheese and chop the sage leaves.

5. Roll out the pizza dough on the parchment lined baking sheet. Spread a thick layer of the butternut squash sauce (will not use all the prepared sauce) and scatter the chopped sage leaves on top. Next scatter the cheese on top of the sauce. Finish off with a few full sage leaves on top.

6. Bake until dough is cooked and the cheese is melted. This depends on the dough you use so look on the box or dough recipe for the time suggested.


Saturday, January 9, 2016

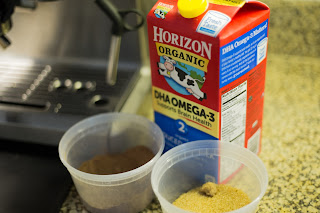
Mocha Latte Recipe

I used to be a slave to the pricey coffee shop espresso drinks but not anymore! One of my favorite presents I received this year was from my loving hubby was a Breville espresso machine. He had noticed that I was craving my espresso drinks since we moved to Southern California and had more time on my hands. I used to be rushing down to the train when we lived in Connecticut and usually couldn't stop by the Starbucks on my way.  Those long lines at Starbucks saved us a lot of money! I couldn't miss my train into the city in the mornings so I just had to pass it by (reluctantly!).

Now we live in Orange County and I've taken some time off from working after completing my grueling (yet unbelievably rewarding) fellowship program. Like I mentioned in an earlier post though, my pregnant body cannot tolerate too much sugar so even though I've been wanting my mocha latte (decaf of course), I haven't felt too good after all that added sugar. When the hubby bought me the Breville espresso machine, I figured out a way to get my mocha latte with a silky chocolate flavor but without too much sugar to system.


Life in California has made us slow down and instead of rushing to the train in the morning and feeling stressed out, we enjoy nice walks on the beach. I loved my busy, fast paced lifestyle but I'm enjoying the reprieve.... before our first child comes along at least....


Decaf Mocha Latte
Serving: Makes 1 cup

Decaf espresso beans
1 teaspoon sugar in the raw
1 tablespoon unsweetened cocoa powder
3/4 cup 2% milk (can use other milks but non dairy will not froth the same as dairy milk)

1. Grind the beans and make the espresso shots as directed by your espresso machine.

2. Add the sugar and cocoa powder into the milk carafe before the milk. There is no need to stir it together because the frothing will mix it all up. 

3. Froth the milk until it doubles in size. Pour the espresso shot into the cup then pour the chocolate milk on top.


Enjoy!!!!

Wednesday, January 6, 2016

Gluten Free Chicken and Waffles

Even though our new SoCal lifestyle has improved our lives significantly, I am still missing some of my favorite NYC restaurants. One place that satisfied my gluttonous side was Friedman's Lunch and their gluten free chicken and waffles. It was amazing to have gluten free fried chicken and who doesn't love waffles?!?!

This last Thanksgiving vacation my family decided to do a tapas night. I decided to tackle this recipe and make it my own. The original recipe has cheddar cheese in the waffles they make a tabasco honey sauce. I decided to add turkey bacon to the waffles and make the chicken spicy in the flour dressing. I'm also not a big fan of home frying (mostly because of pure laziness) so I baked the chicken instead. Makes it quicker and healthier!

This would be a perfect recipe for a cocktail party. Just cut the chicken tenders into nuggets before coating and cut the waffle pieces into smaller pieces. I liked making it more of a chicken waffle sandwich so it was easy to handle with your hands. You can make a honey tabasco dipping sauce or just used maple syrup. It all depends on how spicy you want to make it. If your my family (me definitely excluded), there would be heat in the waffles, chicken and sauce!

While there are certain things I'm missing about my East Coast lifestyle, at least now I don't have to miss my gluten free chicken and waffles!


Gluten Free Chicken and Waffles
Cooking Time: 35 min
Serving: 12 waffle sandwiches

1 batch waffle mix (I used King Arthur waffle mix)
6 strips turkey bacon
1/2 cup cheddar cheese
1 lb chicken tenders
1 1/2 cup gluten free flour
1 teaspoon salt
1 teaspoon black pepper
1 teaspoon garlic powder
1 teaspoon paprika
1 tablespoon Turkish red pepper (can use cayenne but decrease to 1 teaspoon)
1/4 cup olive oil 
maple syrup for dipping (optional)

1. Preheat the oven to 425 degrees and line a baking dish with parchment paper.

2. Cook the turkey bacon until crisp and cut into small pieces. 

3. Make the waffles according to your mix instructions. Add the cooled turkey bacon and cheddar cheese. Allow it to sit and let the flavors infuse while you make the chicken. 

4. Mix together the GF flour, salt, black pepper, garlic powder, paprika and Turkish red pepper. Dip the chicken tenders into the flour mix until completely coated. Place on the baking sheets and lightly pour the olive oil over the top of the tenders. Bake for 20 min or until chicken is cooked through, turning them over half way through, and the outside is a nice golden brown. 

5. While the chicken is baking, heat up your waffle maker according to its instructions. Spoon the amount of waffle mix needed for your waffle maker and cook until golden brown. 

6. Place one chicken tender on a 1/4 of a waffle and top with the other 1/4, piercing with a toothpick to keep it in place. Serve with a side of maple syrup and enjoy!


Monday, January 4, 2016

Chia Seed Puddings

I have a HUGE sweet tooth! But I have matured in my tastes and can feel satisfied with less sugar. A little something sweet a couple times a week is how I stopped myself from diving head first into a bag of chocolate chips. I'm currently 7 months pregnant and have found that I want that something sweet but if I have too much sugar my body does not feel good. My intestines do not digest large amounts of sugar well but baby girl is still wanting her sweet fix. These chia seed puddings filled this need and stops me from going in a sugar overload.


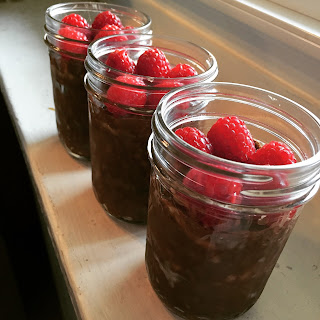
It's super easy to make and even my mother, who was never a cook, makes these with ease. I like to make a big batch in some tubberware, then after letting it set overnight I put them in the little mason jars and top with granola and/or fruit. My husband loves to have one of these in his lunch. It's a great afternoon pick-me-up on those long work days!


Chocolate Chia Seed Pudding
Cooking Time: 15 min
Non Active Time: 12 hours
Servings: 5 8-oz mason jars

2 ripe bananas smashed
1/2 cup chia seeds
2 cups almond milk (or other milk)
1/4-1/3 cup unsweetened cocoa powder
4 tablespoons maple syrup
rasperberries for topping

1. Smash the two bananas with a fork. The riper the better for smashing and releasing the natural sugars.

2. Stir in the chia seeds, almond milk, cocoa powder and maple syrup. 

3. Place in the fridge to set over night.

4. The next day divide into mason jars and top with raspberries or other fruit. 


Vanilla Chia Seed Pudding
Cooking Time: 15 min
Non Active Time: 12 hours
Servings: 5 8-oz mason jars

2 ripe bananas smashed
1/2 cup chia seeds
2 cups almond milk (or other milk)
3 tablespoons maple syrup
2 teaspoons vanilla extract
Granola and fruit topping

1. Smash the two bananas with a fork. The riper the better for smashing and releasing the natural sugars.

2. Stir in the chia seeds, almond milk,  maple syrup and vanilla extract. 

3. Place in the fridge to set over night.

4. The next day divide into mason jars and top with granola raspberries or other fruit. 


Gluten Free Turkish Dumplings: Manti

Happy New Year! With a new year, I decided I would finally start the blog that I have been wanting to do for a while now. What has stopped me from doing it? TIME! Anyone that knows me knows that I am a busy woman and I usually fill any of my "down" time with more things to do. Recently we have made some big changes which have given me more time. I am a Physical Therapist and an avid cook. My coworkers, patients and friends have always enjoyed my tasty creations and eventually convinced me to start my own instagram site. I've been starting to get more hits on my pics and thought it was time to start to share my recipes! So here we go....

My husband is Turkish and I'm always trying to find ways to give him a taste of home. One of his father's favorite meals is manti, which are Turkish dumplings with yogurt and spiced oil. We have made it a New Year's tradition to make these.

You have been warned, this is no small undertaking! It took us about 2 hours to complete these but it was worth the work. The creation of the dumplings would be a great job for kids. My husband remembers his mother calling his brother and sister into the kitchen as soon as the dough was cut and dollops of filling were placed in the center. Little fingers are perfect for making these tiny purses!

My suggestion is to make a double batch and freeze half of them after you bake them. It's also nice to make the garlic, mint yogurt the night before so all the flavors can blend into the yogurt. It isn't necessary but it adds depth to the flavors. I hope you enjoy! Afiyet olsun!


Gluten Free Manti
Prep Time: 1 hour 30 min
Cooking Time: 30 min
Servings: 4

2 cups plain yogurt (my husband loves Trader Joe's European Style Yogurt)
4 garlic gloves minced
1 1/2 tablespoons dried mint
1/2 lb ground lamb (can use beef as well)
1 small yellow onion grated
1 teaspoon salt
1 teaspoon black pepper
1/2 cup olive oil
2 tablespoons tomato paste
1 1/2 tablespoons Turkish red pepper (aleppo pepper)

1. Make the wonton wrappers according to the directions and allow to rest before rolling out.

2. While you let the dough rest, make the yogurt sauce and meat filling. Combine the yogurt, garlic and mint in a bowl and refrigerate it (can make this the night before). Mix together the meat, grated onion, salt and pepper really well. Make sure there aren't any large pieces of meat and onion separated. 

3. Work in batches rolling out the dough (I did it in 4 different batches) as thin as you can. Make 1.5 inch by 1.5 inch squares. 

4. Preheat your oven to 350 degrees and line two large rimmed baking pans with parchment paper. 

5. Place between 1/4 and 1/2 teaspoon of filling in the center of each square. Bring the four corners of the square together, pinching all the seams closed. Place them on a baking sheet. When done with the batch, cover the dumplings with a damp cloth to keep them from drying out. Repeat with the remaining of the dough.

6. Bake the dumplings for 12-15 minutes. They will brown slightly on the bottom.

7. While the dumplings are in the oven, start a large pot of water and salt boiling. Add the dumplings to cook until tender, about 15-18 min. Drain the dumplings when done, return to the pot and pour a little olive oil to make sure they don't stick. 

8. While the dumplings are in the boiling water, put the oil in a large skillet and heat over medium heat. When the oil is warm, whisk in the tomato paste and cook for 3 min. Add the Turkish pepper and cook for another 2-3 min to profuse the oil. 

9. To assemble: divide the dumplings between the 4 bowls. Spoon about 1/3 cup of yogurt over the top and spoon some of the spiced oil on top of the yogurt. Place the remaining of the yogurt on the table for people to add if wanted.